Online Account/Menu Setup Steps:
All Data needed should be collected in the "Subscription Agreement" and the "On-Boarding Checklist" Tickets
Step1: Create a New Vendor -
Go to Restaurant>Vendors>New
Enter Vendor Details and Save -
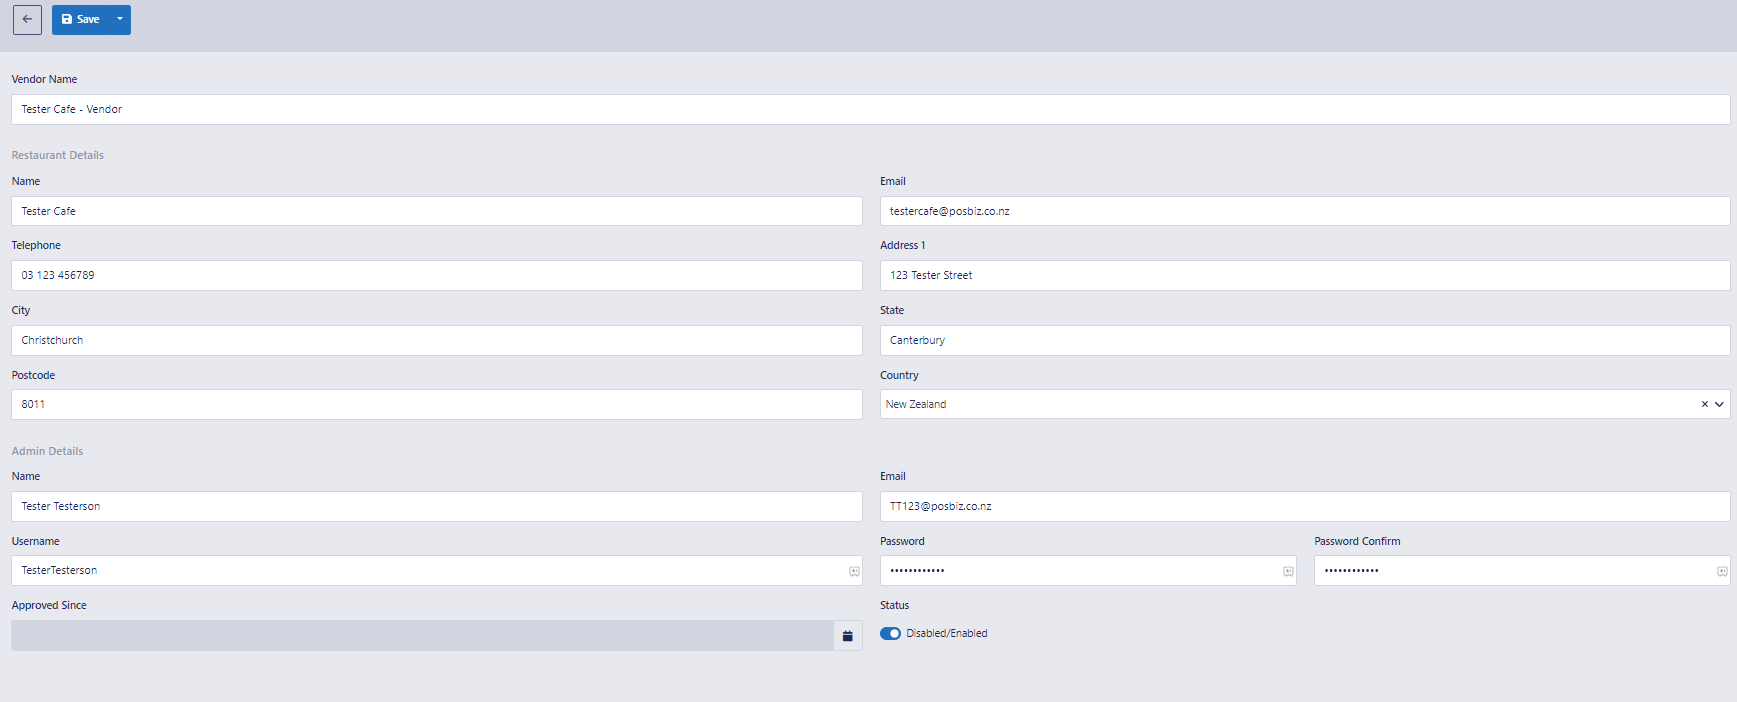
Restaurant Details:
Vendor Name = Company name - from subscription form
Name = Trading Name - from subscription form
Email = Accounts email address/Site email if Accounts blank. - from the subscription form
Telephone = Business customer phone number. - from the subscription form
Address1, City, State and Postcode = Business Location Address. - from the subscription form
Admin Details:
Name = Owner's Name. - from the subscription form
Email = Site Email - from the subscription form
Username = Online Login Username for the Owner. - Owners Name with no spaces.
Password / Password Confirm = Password created for the first time Owner Login, They can change this after they have logged in for the first time. - Owners First name and First letter of last name capitalized and 123456 after.
Status = Whether the User is Active and will be able to login or not, - Change to Enabled.
After Saving, Add the Two Circled options to the Vendor details.
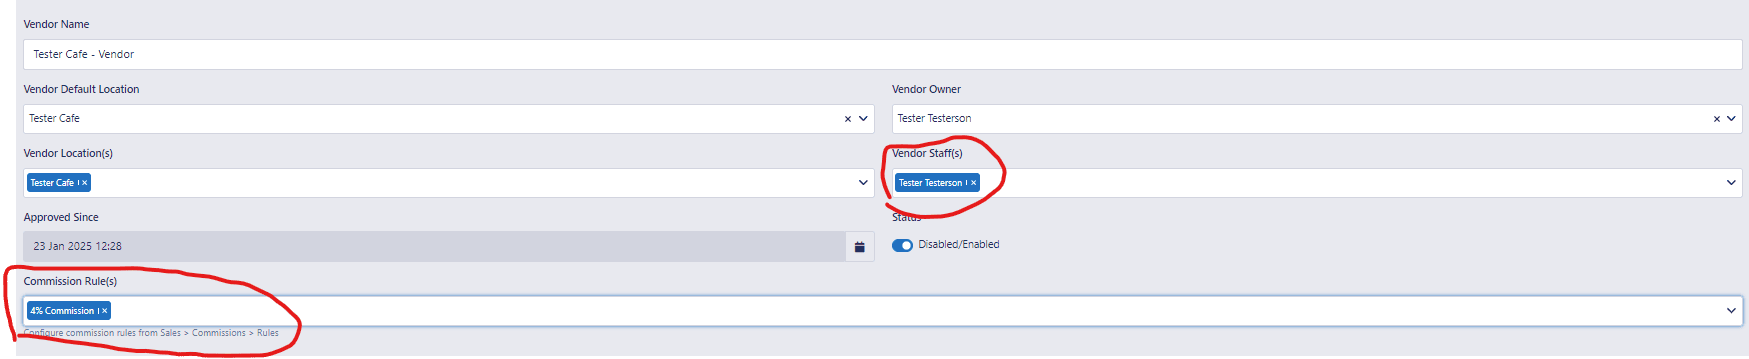
Vendor Staff(s) =Staff members linked to the Business - Currently only the Owner is created as a staff.
Commission Rule(s) = Extra charges added to the customers for things like Stripe Payments and Delivery - Add the profiles 2.7%, $0.30 and Delivery.
Step2: Edit New Location - (Location is Auto Generated from the Step1)
Go to Restaurant>Locations
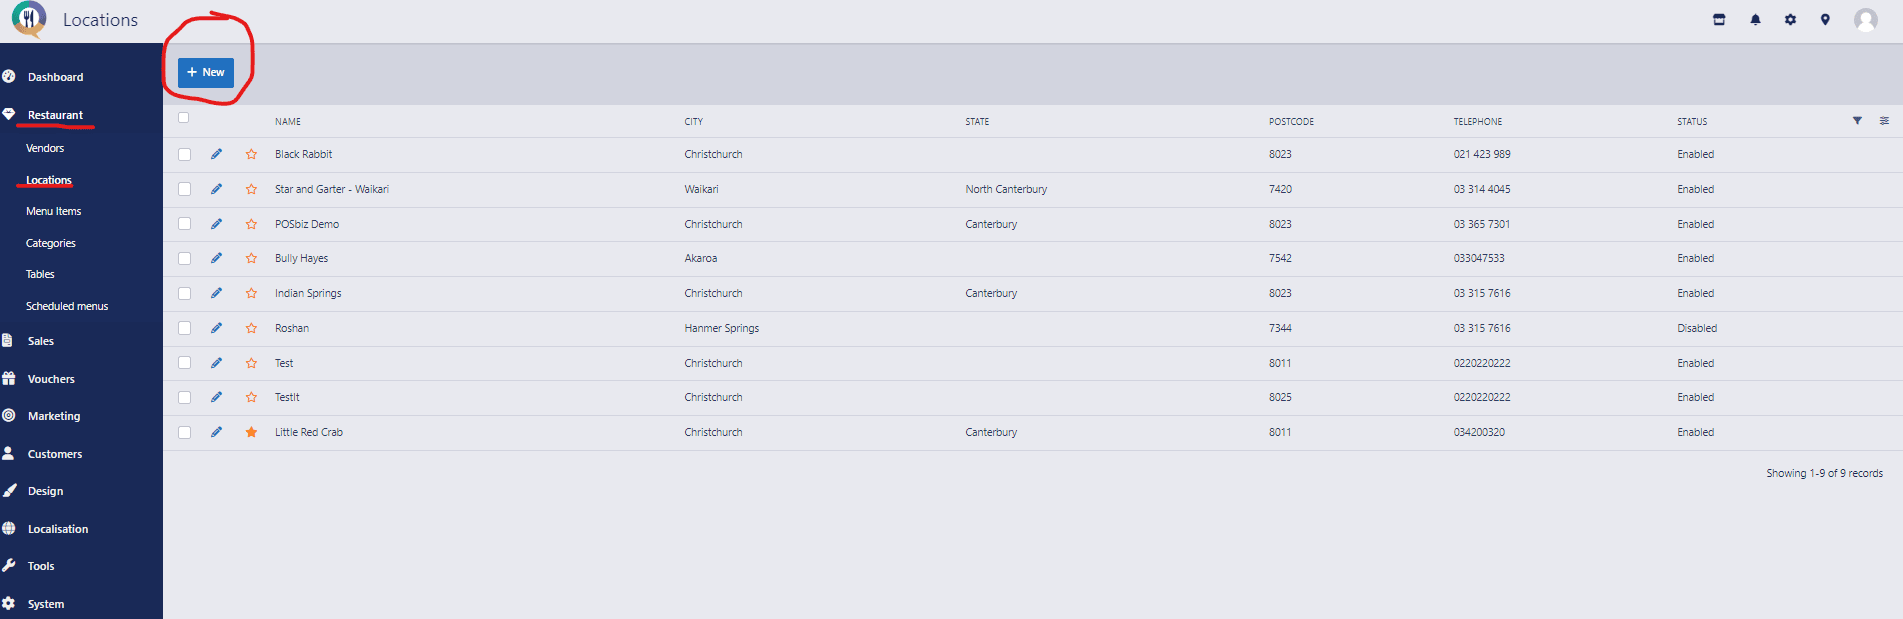
Click the Pencil Image beside the location Name and Enter the General details of the business and save (** means it is required now)-
**Name = Business Name. - Trading Name
**Slug = This is added onto the URL link to the menu with the added "\Menu" at the end - (Auto Generated).
**Email = Site Email from Subscription Agreement. - Site emails to receive Order notifications
**Telephone = Business Phone number.
**Address1, 2, City, State, Postcode and Country = Business Address.
Website URL = Customers Current Homepage Website URL - Add the customers website or social media platform information
Image = Customer's Business Logo - Follow Same steps as is Step 11A (Loading an Image)
**Status = Whether the online link (Slug) is active and working or not. - Set to Enabled
**GST = Customer's Business GST Number - from the subscription form
Step3: Add Onsite Manager Staff User/login. -
Go to System>Staff>New
Fill out the details Below, and then "Save":
**Name = Set to Manager - the business name - eg: Manager - Mcdonalds
**Username = Set to the Name with no spaces - eg: ManagerMcdonalds
Language = Set to English
**Send Invitation Email = Untick this box.
**Password = Set just like step1 - eg: ManagerM123456
**Password Confirm = Set the exact same password
**Locations = Set to the "Location" just created. - eg: Mcdonalds
**Groups = Set to "Manager"
**Role = Set to "Multi Vendor Owners"
**Super Admin = Set to "Disabled"
**Status = Set to "Enabled"
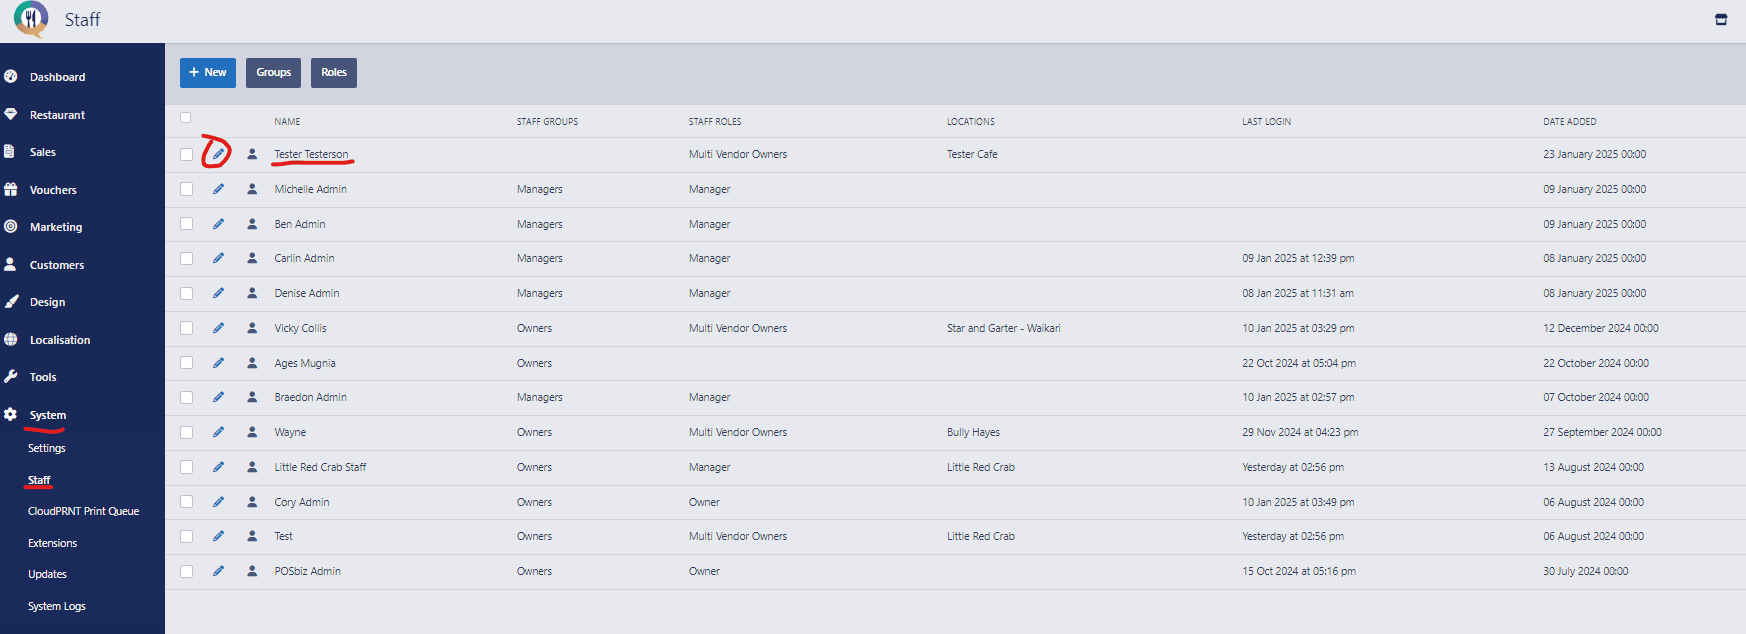
Step4: Edit Owner's Staff login. -
Go to System>Staff>(Pencil Image on New Staff created) to edit the staff created.
Make sure that the "Groups" is set to Owner, "Locations" is set to the correct Location created and "Role" is set to Multi Vendor Owner.
Make sure that the "Groups" is set to Owner, "Locations" is set to the correct Location created and "Role" is set to Multi Vendor Owner.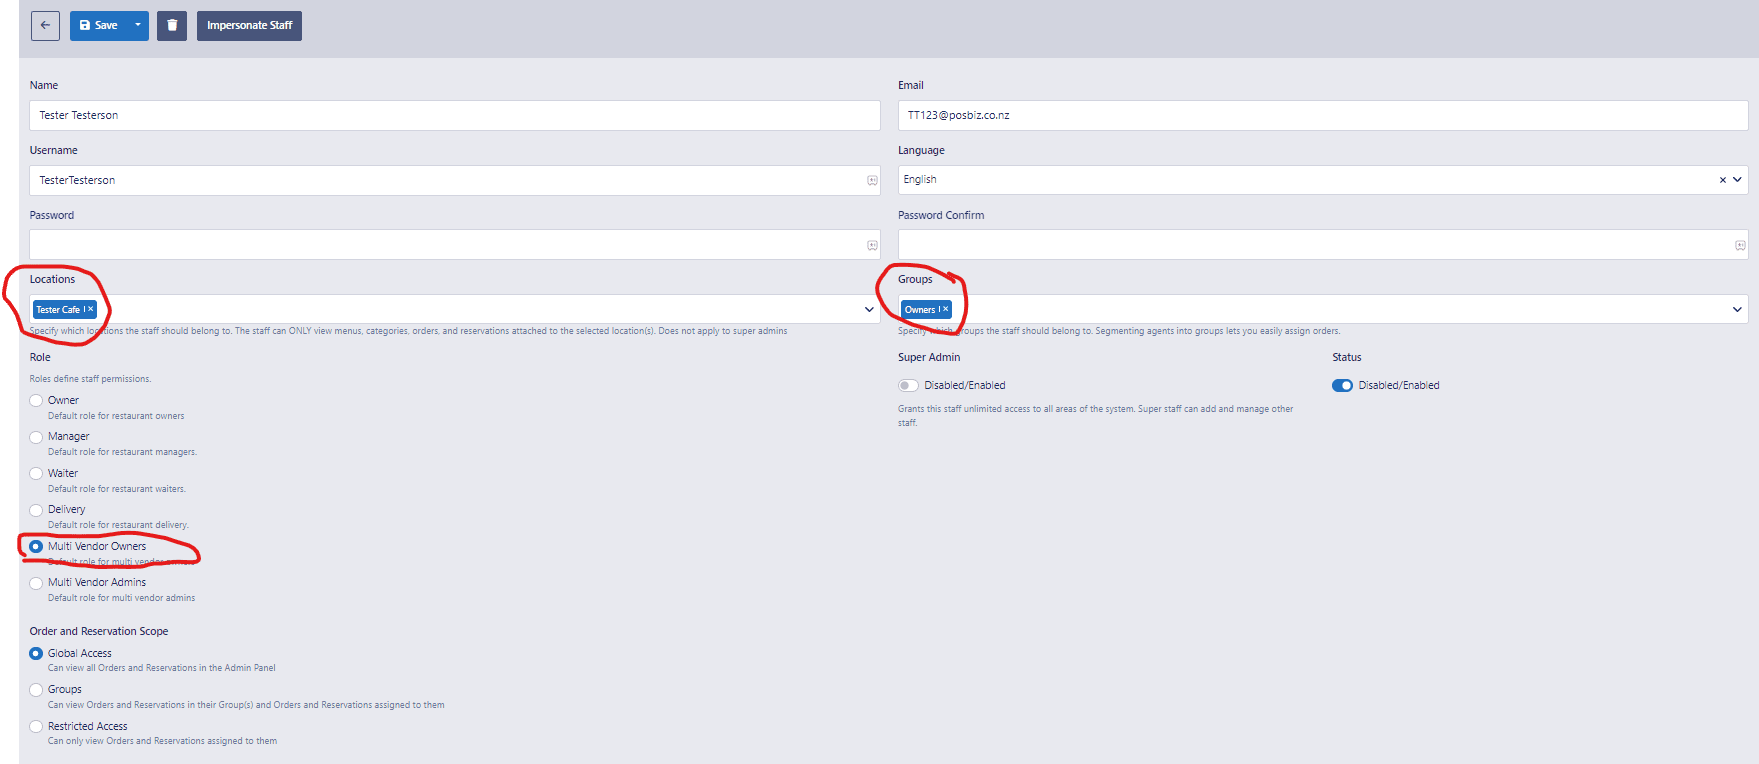
Step5: Update the Vendor Details -
Go to Restaurant>Vendors>(Pencil image for the Business just created)
Add the New Manager-(Business Name) Staff member to the Vendor Staff(s) List,
Step6: Create Menu Schedule for the location -
Going to Restaurant>Scheduled Menus>New to create the Menu Times for the location. Enter the details as follows, to create Menu Schedules for the location.
Menu Name = "All Day - (Business Name)" unless specified item Course Times are wanted and are in the Onboarding Checklist.
Location(s) = Set as the (Business Name) Location wanting to link this too.
Status = Enable to make it live and ready to go.
Menu Ends = Make this 100years from now at midnight Eg: instead of "27/01/2025 23:59", Set as "27/01/2125 23:59" Availability = Leave as "00:00" and "23:59" for each day to represent "All Day" unless specified times are given for the Course Times for each day in the On Boarding Checklist.
Then Save.
Step7: Adding the rest of the specific locations details -
Go to Restaurant>Locations>(Edit pencil image for the location wanted)
Schedules:
- "Opening Schedule" Used For Online Orders/Reservations/Gift Voucher/QR Code Subscriptions Opening Hours best to be set to "Flexible" and any time chunks are separated with a comma ","
- "Delivery Schedule" Used for Online Orders Subscriptions, Delivery Hours best to be set to "Flexible" and any time chunks are separated with a comma ","
- "Pick-up Schedule" Used for Online Orders Subscriptions, Pick-up Hours best to be set to "Flexible" and any time chunks are separated with a comma ","
- "Dine-in Schedule" Used for QR Code Table Order Subscriptions, best to be set to "Flexible" and any time chunks are separated with a comma ","
- "Waiter Service Schedule" Used for Online Order/QR Code Subscriptions, Kiosk Station type Orders Currently not in used so set "Flexible" and each day disabled.
Delivery Areas:
- Click "+New".
- Name = 10Km or the Name of the Town/City.
- Area Type = Circle.
- Delivery Charge = Press the "+" button but leave as default.
- Distance Based Delivery Charge Condition = Enlarge the area to the size in Km wanted.
- Save.
Loyalty Points:
- Enable and only set he setting below leave the rest as default
- Override default Loyalty Settings = Enabled
- How Much Each point is worth to redeem = $0.00
- Minimum points required to make a redemption = 100
Options:
- Payments = Select Cash or Stripe Payment Depending is Delivery is going to be enabled then it must only be "Stripe Payment" that is enabled.
- Delivery Options:
- Offer Delivery = Set to Enable if they have said yes in the onboarding checklist and fill in the below details.
- Add Lead Time to Delivery Start Time = Enable.
- Delivery Time Interval = Set to 15. - unless otherwise requested by the customer
- Delivery Lead Time = Set to 15. - unless otherwise requested by the customer
- Delivery Order Cancellation Timeout = Set to 15 - unless otherwise requested by the customer, matching the Lead time to allow no cancelation time, Setting 14 would mean they have 1minute
- Delivery Provider = Set to Doordash unless stated for Uber in the onboarding checklist.
- Delivery Print Status Mode = Set to Automatic
- Allow Pre-Order for Delivery = Enable only if stated in the onboarding checklist and change the "Delivery Print Status Mode" to Manual instead.
- If Pre-Order is Enabled Set Minimum and Maximum to what is stated in the onboarding checklist or leave as defaults.
- Pickup Options:
- Offer Pickup = Set to Enable if they have said yes in the onboarding checklist.
- Add Lead Time to Pickup Start Time = Enable.
- Pickup Time Interval = Set to 15 unless otherwise requested by the customer.
- Pickup Lead Time = Set to 15 unless otherwise requested by the customer.
- Pickup Order Cancellation Timeout = Set to 15 unless otherwise requested by the customer, to match the lead time and allow no cancelation time, Setting 14 would mean they have 1 minute
- Allow Pre-Order for Pickup = Enable only if stated in the onboarding checklist.
- If Pre-Order is Enabled Set Minimum and Maximum to what is stated in the onboarding checklist or leave as defaults.
- Reservation Options:
- Offer Reservations = Enable if they have said yes in the onboarding checklist.
- Automatically Allocate Tables = Enable unless otherwise requested by the customer
- Reservation Time Interval = Set to 15 unless otherwise requested by the customer
- Reservation Stay Time = Set as is in the Onboarding checklist
- Walk in Timeframe = Match the Reservation Stay Time
- Max. Advance Reservation Time = Set as is on the onboarding checklist
- Limit Reservation Guest count = Enable
- Maximum Guests Per Interval = Set to 15 unless stated differently in the onboarding checklist.
- Reservation Cancellation Time = Set to 60
- Custom Reservation Message = Add any custom message the owner would like to show for the customers Eg the maximum guest count per online booking
- Enable AI Assistant = Set as Disabled unless specifically requested by the customer in the onboarding checklist.
- Include Start Time in Reservation Timeslots = Set to Enabled unless specifically requested by the customer in the onboarding checklist for a different time.
- Allow Custom Reservation Time = Set as Enabled and fill in the Breakfast, Lunch and Dinner Schedule times below.
- Breakfast Schedule (per day) = Set as requested from the onboarding checklist.
- Lunch Schedule (per day) = Set as requested from the onboarding checklist.
- Dinner Schedule (per day) =Set as requested from the onboarding checklist.
- Special Requirements = Add and Special Requirements as requested in the onboarding checklist Eg: Wheechair access, High Chair, Window Table.
- Deposit Guest Limit = Leave as Default unless requested in the onboarding checklist for a Deposit over a certain number of guests in the booking
- Deposit Payment Amount = Leave as Default unless requested in the onboarding checklist for a Deposit amount over a certain number of guests in the booking
Dine-in:
- Offer Dine-in? = Enable if they are doing QR Table Ordering.
- Dine-in Time Interval = Set to 1
- Dine in Lead Time = Set to 1
- Offer Waiter Service? = Disable
- Only Available to staff users = Disable.
- SAVE.
Generally Denise Completes Step 8-11B - Continue from Step12 unless Denise is not available to do those steps.
Step8: Impersonate the Staff member for the location just created -
Go to Restaurant>Staff>(Little Person Image) impersonate
Making sure to impersonate the Owner or Manager for the location you are creating.
Step9: Creating the Categories -
While Impersonating the staff member go to Restaurant>Categories>New to create the Courses (Categories) from the Existing Menu or Options wanted.

Enter the details as follows, then Save:
Name = Set Course Name. Eg: "Drinks" or "Alcoholic Drinks"
Slug = Set as a Globally Unique name Eg: "TESTERC_DRINKS" or "TESTERC_ALCOHOLIC_DRINKS", "TESTERC" only being used for the "Tester Cafe"
Location(s) = Set as Location/s just created.
Status = Set whether this category is live/showing on the online Menu or not.
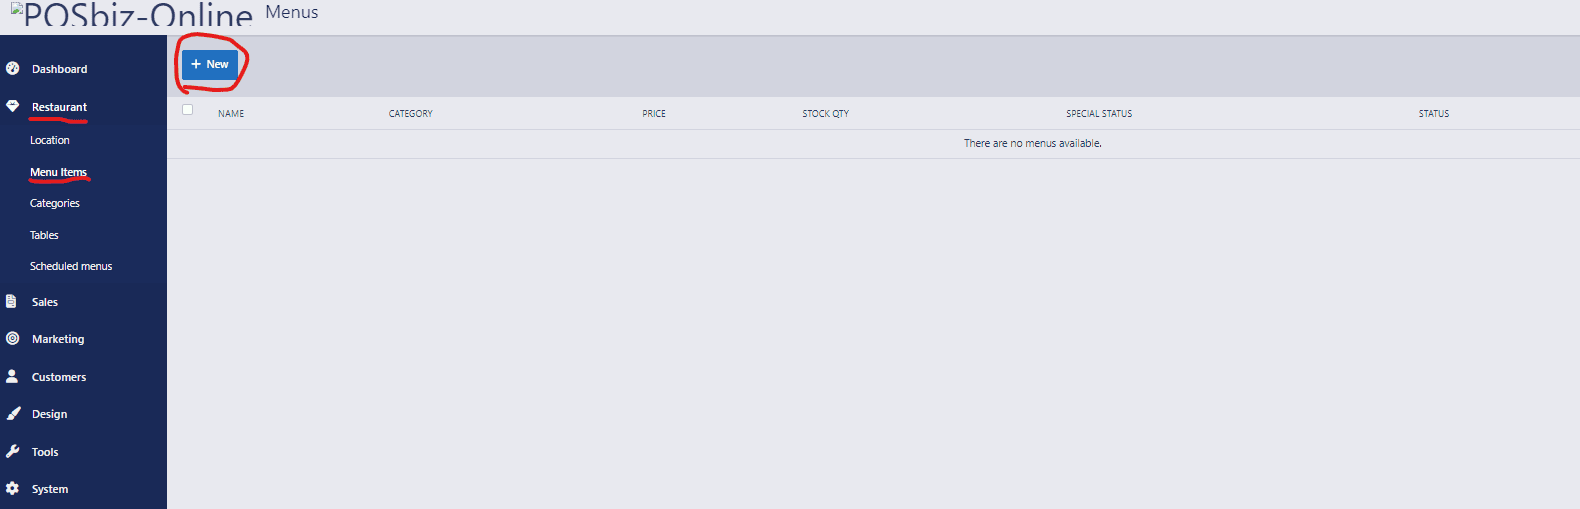
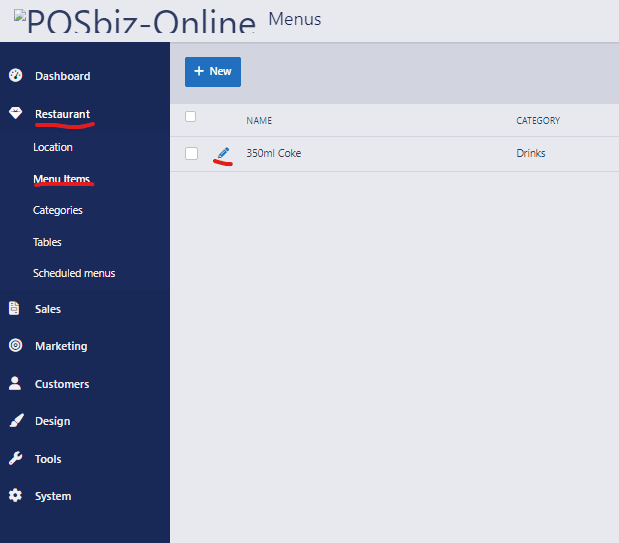
Step10: Creating the Menu Items -
While impersonating the staff member go to Restaurant>Menu Items>New to create the menu items wanted under each category.
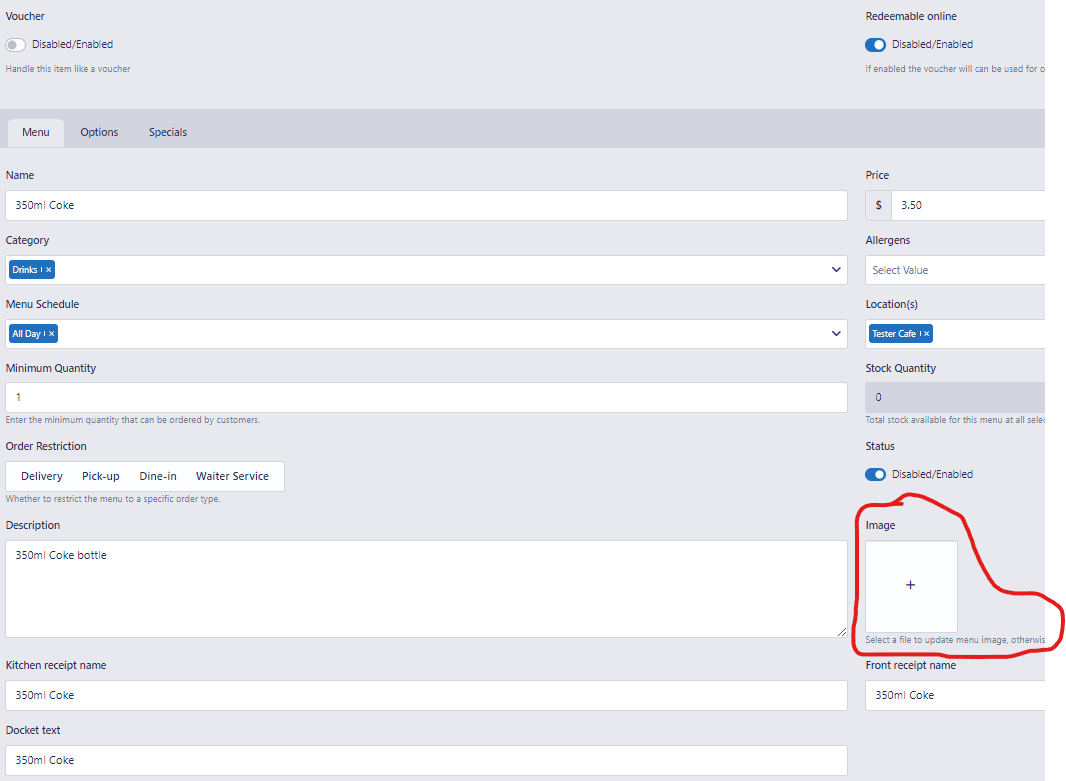
 Enter the details as follows, then save: (Ones with a ** next to it are required)
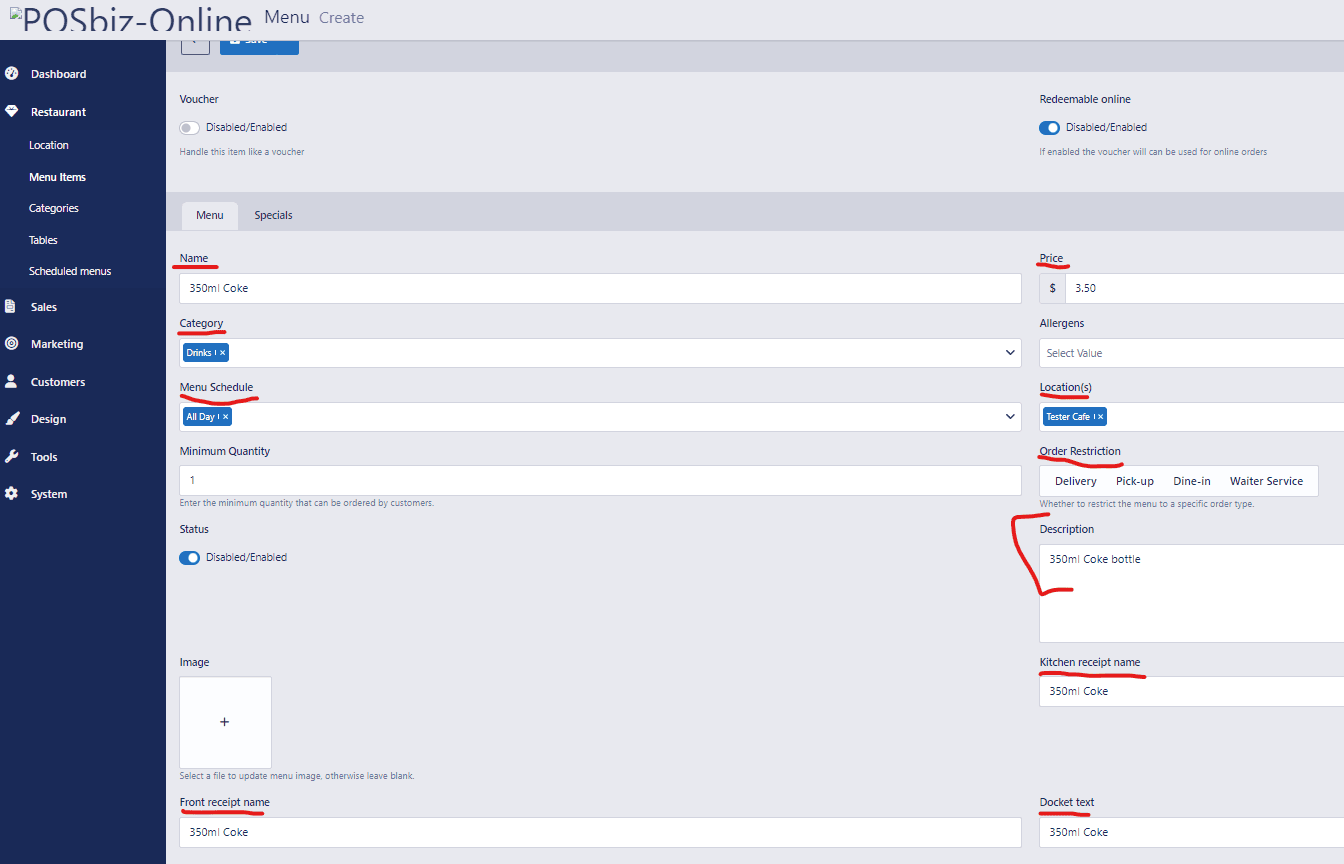
**Name = Product Item Name showing online.
**Category = Which Category (Course) Tab this Item will sit under.
**Menu Schedule = Set to "All Day - (Business Name)" Unless multiple menu schedules are being used.
**Status = Enable this to make it visible online.
**Front Receipt Name = Same as the "Name" unless wanted different for the Customer Receipt.
**Docket Text = Same as the "Name" unless wanted different.
**Kitchen Receipt Name = Same as the "Name" unless wanted different for the Kitchen Docket.
Description = Optional Description of the Item that displays online for the patrons to read about the Item. Max Quantity = Maximum quantity of the item that can be added per order/customer.
Order Restriction = Leave Blank if not wanting any restrictions on ordering this item, Can select certain Order Types to allow adding this item Eg: Delivery or Pickup only with have the "Delivery" and "Pickup" options selected.
**Location(s) = Set this to the Store location.
**Price = Price of the item.
Allergens = Can be added information about the item from the default of GF "GlutenFree", "V" Vegan, DF "DairyFree" or Vege "Vegetarian".
After the Item Has been saved, "Options" for the Item Can be set Eg: Sizes / Sauce options / Spice Level / Meat options etc...

First time options will need to be Created:
Go to Options as shown above,
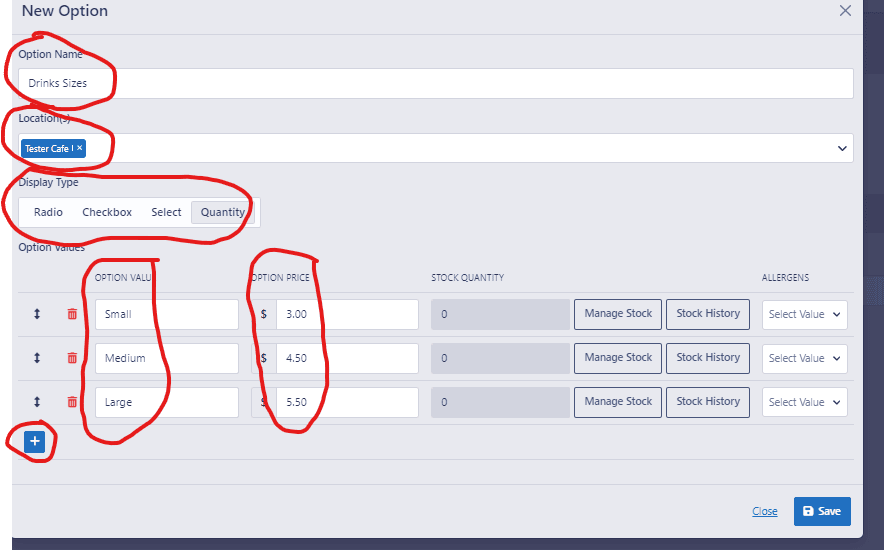
Select "+New Option" for a first time option and Enter the details:
Enter the "Option Name" Eg: "Drink Size"
Enter the "Location(s)"
Select the "Display type":
1. Radio - Circle selection boxes that only allows one choice.
2. Check Box - Check boxes that allow multiple choices.
3. Select - Dropdown box for only one selection.
4. Quantity - Check boxes with Quantity selection input.
Add the options wanted by pressing the "+" button and Typing a description into the "OPTION VALUE" field and putting a price if needed into the "OPTION PRICE" field.
OR,
Click the dropdown box under "Option" for the list of already created options and select and/or edit them then save it to the item.
Step11A: Adding an Images to the Folders -
While Impersonating the Owner of the Location go to Tools>Media Manager and add a New Folder for the Location with the same Name.
1 - Image Folder Selection.
2 - Uploading the Image from the current device, Must be: jpeg or png, as square as possible and a Max of 400px on either dimension.
3 - New Folder.
4 - Rename Folder.
5 - Delete Folder.
Step11B: Adding the Image to the Item -
Go to Restaurant>Menu Items>(pencil image)on the Item>Image "+"
Select "Upload" to import an image into the folder wanted. (default has no folders created)
Select "New Folder", "Rename Folder" or "Delete Folder" to edit the folders.
Step12: Creating and Adding a Printer:
1. Connect and Install USB Printer onto Windows PC Requested, Name "Online1" and Windows Test Print.
2. Copy the WINUSB Driver to the PC from your Software folder or attached to this Article:
3. Install the WINUSB Driver on the PC and attach to the online Printer:
- Run the WINUSB Driver installer,
- Select: Options>List all devices, From the Drop down box select the USB Printer Name. Eg: "POS80" for the POSbiz USB Receipt Printers.
- Select Replace driver.
After Success, the Windows Printer "Online1" will show as Offline - This is Normal,
The Online Printer will use the ZAdig driver (WINUSB.) instead of "USB Printing Support".
(If the wrong printer is selected then the device's Driver must be changed back to "USB Printing Support")
Step13: Adding Online Order Notification App -
1. Copy the "Online Notification App" Folder and all contents to the Windows PC requested to get the notifications of Orders Received.
2. Install "node-v16.20.0-x64.msi" - Clicking through but making sure "Super Server" is selected.
3. Change and Save "config.json" file with the below details:
- "location_id": 8, (Change "8" to the Location's ID number located in Restaurant>Locations list)
4. Change and Save "small.js" file located in the "Examples" folder,
- Open with Notepad,
- Locate "Start tunnelmole properly"
- Make sure Domain settings are set to "domain:config.json // replace with your key"
- Save the File.
5. Attempt to Run (as admin) the "posbiz.exe" file from within the "posbiz-order-notif" folder.
- If Success the bottom of the command windows will show "Listening for New Orders", minimize the App and Pin to the taskbar.
- If Failed will display an error, and requires further files installed,
- Double check the fire wall is disabled,
-If device is Windows11,
- Right-click the "posbiz.exe" file and select "Open in Terminal",
- Enter command "npm install" and after completed try running the "posbiz.exe" file again.
- If Success minimize APP and Pin to task bar,
-If it fails again, Pass onto Ages (online developer) to check as to why it failed and fix).
- If device is Windows10 or earlier,
- Open a Command Prompt as Admin and connect to the Directory file "posbiz-order-notif"
- Enter the command "npm install", after completed try running the "posbiz.exe" file again.
- If Success minimize APP and Pin to task bar,
- If it fails again, Pass onto Ages (online developer) to check as to why it failed and fix).
Step14: Adding Reservations -
1. Follow Steps 1-8 and then follow the below steps.
2. Go to Restaurant>Location(s)>(Editing pencil image for the location wanting to setup reservations)>Options>Reservations Options
3. Scroll down to "Allow Customer Reservation Time" and Enable it.
4. Scroll to "Breakfast Schedule (per day)" and add the individual days for the week dictated by the "On Boarding Checklist"
5. Scroll to "Lunch Schedule (per day)" and add the individual days for the week dictated by the "On Boarding Checklist"
6. Scroll to "Dinner Schedule (per day)" and add the individual days for the week dictated by the "On Boarding Checklist"
7. Scroll to "Special Requirements" and add each special requirement as stated in the "On Boarding Checklist"
8. Save.
9. Go to Restaurant>Tables>+New
10. Create the Tables for the location(s) indicated on the "On Boarding Checklist"
**Name= Table name,
**Priority= The order in which they are automatically assigned if available within groupings,
**Minimum Capacity= Minimum guests for the table,
**Maximum Capacity= Maximum guests for the table,
**Status= If the table is enabled or not,
**Is Joinable= If the table can be joined with other joinable tables next in priority and grouping settings,
**Location(s)= The Location that the Table is available to be used at,
**Group= Group Name for joinable tables Groups, (Tables from different Groups cannot be joined)
**Allow Customer Booking= "No" cant be auto assigned when making a booking, "Yes" can be auto assigned when making a booking,
QR Code= Automatically Created after the Table has been created and is Unique to each table.
11. Save.
Step15: Adding Giftcards/Vouchers -
1. Follow Steps 1-9 and then follow the below steps.
2. Go to Vouchers>Templates
3. Create a NEW Template for the customers Location if needed or ignore and continue to the next step.
4. Go to Restaurant>Menu Items>+ New
5. Enter the below fields details for Each Voucher Wanted and then save each one:
**Voucher - Enable
**Voucher Template - Select the Template created or select a Demo Template.
**Name - Gift Voucher Name to show online.
**Price - Price of the Voucher.
Priority - The Order that they will show on the Online Order page, within the Category assigned.
**Category - The Category that the voucher will show under.
**Menu Schedule - Assign the default (All Day) Schedule created.
**Location(s) - Select the Location assigned to this Gift Voucher.
**Minimum Quantity - If Different from the default of 1
Order Restriction - Option to restrict the Item to being purchased only on specific Order Types
Eg: Delivery/Pick up only - you would select the Delivery and Pickup option, (the default is unselected for all so it is available for all options.)
**Status - Enabled=It shows on the Menu, Disabled=Doesn't show on the Menu.
Description - Brief details about the Voucher Item.
**Max Quantity - Maximum number that can be purchased per Order/Customer, Defaults to .
**Kitchen Receipt Name - Same as the "Name" unless wanted different for the Kitchen Docket.
**Front Receipt Name - Same as the "Name" unless wanted different for the Customer Receipt.
**Docket Text - Same as the "Name" unless wanted different.
Step16: Adding Holiday or Special Hours -
1. Go to Restaurant>Holiday Hours>New Holiday Hours
2. Fill in the details for the Holiday hours. (** is required to be filled out.)
**Name - Add a Name for the Holiday for Example: "Xmas Hours", "Refurbishment" or "Personal Family Emergency".
**Location - Set the Location to the Business Location wanted.
**Type - Complete Closure: After Selecting move to the Start Date next.
- Special Hours: After Selecting add the New Monday to Sunday Open and Close Times in 24hr format Eg: "00:00-23:59".
- Holiday Hours: After Selecting add the New Start time and End Time blanketed for Every enabled day within the open schedule in a 24hr format.
- Special Reservation Holiday: After selecting
**Start Date - Add the Start date at 00:00:00 that this new hours schedule will begin.
**End Date - Add the End date at 23:59:59 that this new hours schedule will end.
**Recurring - Select either "One-time Only" or "Every Year"
Description - Optional Description on What exactly the holiday hours are for
3. Click Save.